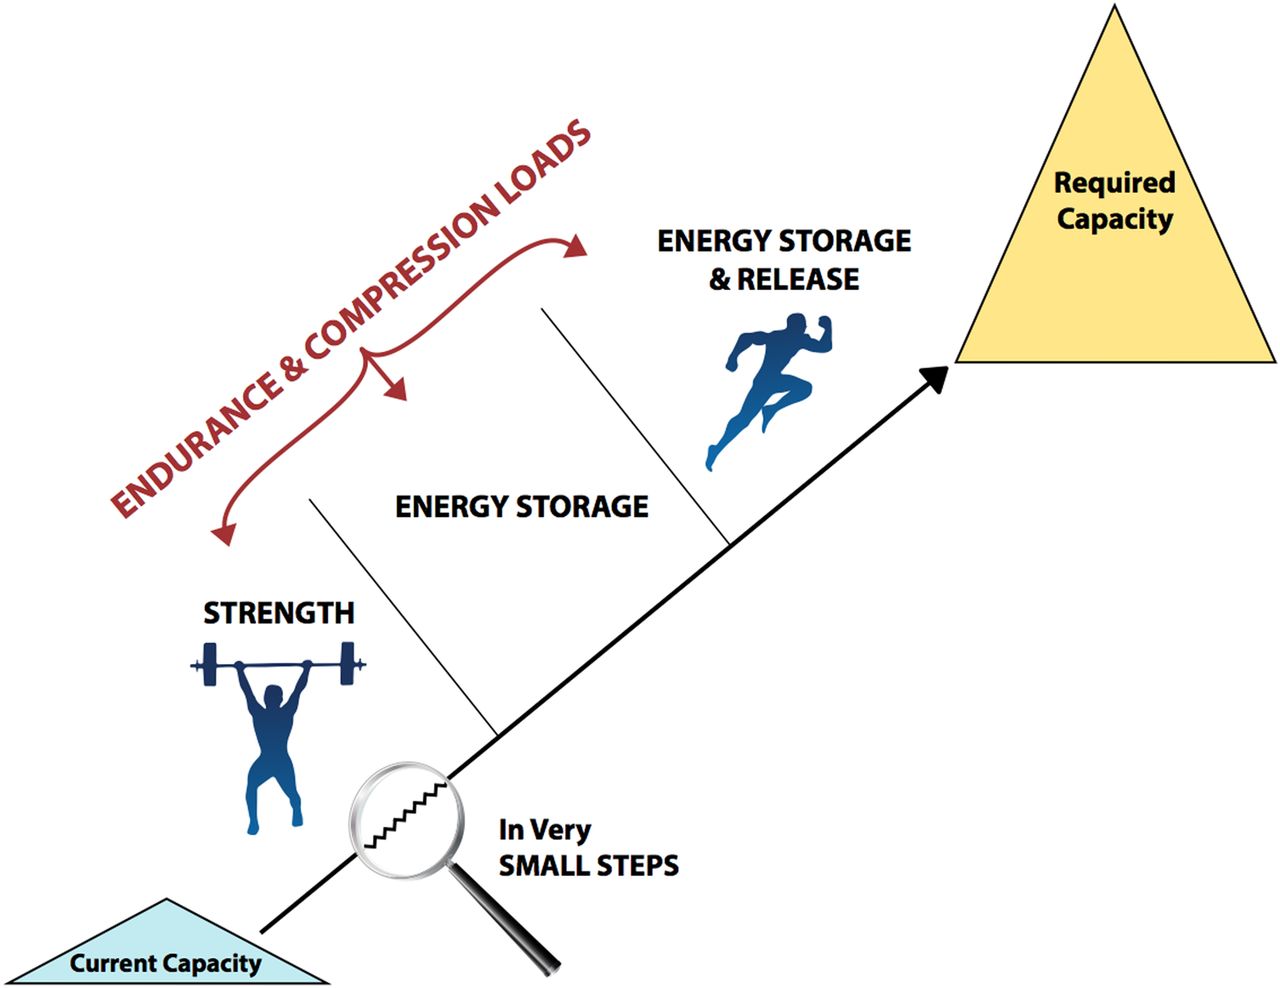
My favourite part my job is after making an accurate diagnosis of where the patients pain is emanating from (the tendon in this case), is the rehabilitation process. This is a physiotherapists medication that we give to our patients along with good sound advice (even if they hate it) to make the pain go away or if not help them manage their pain in the activities they do. I love the rehabilitation process because I can be creative and individualise exercises to each patient and see what they are capable of but also making them effective so we are bringing our patient back to his/her desired goal (within this is where my job satisfaction lies). This is a step by step process and we must keep in mind the tissue healing process and the patients’ response to the exercises (too much or too little). Lower limb tendon pain will respond best to a loading program which will improve tendon capacity with progressive loads as shown in the figure below (Cook, docking 2015).
Schematic of tendon rehabilitation, improving tendon capacity with progressive loads. The progression of endurance and compressive loads are critical within each stage. The rehabilitation program will vary between individuals but the goal is one… getting you back to the required capacity.
I will now describe to you the different stages in the rehabilitation for lower limb tendinopathy.
Stage 1. Isometric exercise
Isometrics (no movement in the joint) is a good place to start especially in a reactive or degenerative tendon (please refer to part 1 if you need to recap on a reactive or degenerative tendon). Isometric exercise can provide pain relief in 7-10 days in a reactive or degenerative tendon but can take up to 6-8 weeks on a reactive tendon.
Isometrics have been shown to improve pain in patients with patella tendinopathy for up to 45 minutes (Rio et al 2016). In clinic, isometric exercises are really good to manage pain in the reactive stage when the symptoms first come on and nice to give to patients because they are simple yet effective. In patients with patella tendinopathy (mainly seen in young active men who participate in jumping activities), research has proven that four repetitions of 45 second holds at 70% of maximum contraction is appropriate for a painful tendon (Rio et al, 2016). This could be done on a leg extension machine, leg press machine or even against the wall in a squat position using own bodyweight. The level of loading will have to be varied for the older patient, varying load and time. A person with a reactive Achilles tendinopathy, they can follow the same protocol by doing a standing calf raise using own bodyweight or a load you can handle or on a seated calf raise machine in the gym holding a sustained contraction. As isometrics need to be done more than once a day, doing them at home is a better option.
Stage 2. Isotonic exercise
Once the pain is under control and lost its edge, isotonic (the muscle shortens when it contracts concentrically and lengthens when bringing the load back down eccentrically through the joint ranges) exercises can be started. These are slow and heavy concentric/eccentric exercises to improve the strength in the muscle tendon unit. These are best done by holding the eccentric (lengthening of the muscle) component a little longer (e.g. three-second concentric with four-second eccentric). So a patient with patella tendinopathy can go through a comfortable range with minimum pain on the leg press machine by adding weight, or by doing squats with a barbell or dumbbells or even kettle bells. This can then be progressed to single leg strengthening exercises such as single leg squats, lunges, single leg on leg press machine etc which will also work the muscles up the kinetic chain and it’s important to strengthen those too. In patients with Achilles tendinopathy, applying the same principles on a standing calf raise machine, or seated calf raise machine or calf raises in a squat rack with a barbell are good options and progressions depending on the symptoms which will determine the exercise and load.
Isotonic exercises should be continued until there is good strength in the affected musculotendinous unit and kinetic chain. This can take up to 12 weeks in someone who has been very unloaded due to their symptoms. An endurance set can be added if the person requires high levels of endurance for their activity such as stair climbing for Achilles and patellar tendinopathy. There is evidence that a bout of isometrics before isotonic exercises have shown to increase the maximum voluntary contraction in a muscle so useful to continue those throughout the program (Rio et al, 2016).
Stage 3. Energy storage exercise
Once the muscles are stronger we can begin to quick energy storage and release exercises. You will need to do a faster eccentric exercises, initially with a slower release (concentric phase) but then building to a faster release. These exercises place a higher load on the tendon and should only be done 2-3 times a week. These exercises are to be started at a lower level and the gradually increased. It is essential you continue stage 2 exercises twice a week throughout the program until you have returned to your activity (i.e. running, football, gymnastics etc). At this stage we are working on power so increasing the velocity is the key in preparation for the next stage.
Stage 4. Activity-specific energy storage and release exercise
Once the tendon can tolerate high-energy storage loads with no to minimal pain, then functional activity-specific exercises can be introduced in a clinical or gym setting. These will replace stage 3 exercises and to be done 2-3 times a week. Exercises like vertical jumps springing off two legs then progressing to single leg and then hopping forwards starting with two legs then single leg, box jumps, jumping and landing from a box are good exercises for Achilles and patellar tendinopathies progressing gradually guided by your symptoms and ability. Exercises such as fast stair running and skipping with rope are really good exercises for the Achilles tendon and in preparation to return to a controlled training environment and then to a graduated return to competition.
This is a step by step process and no one size fits all so the training program will vary between individuals and taking into consideration the type of activity they would like to get back to doing. It is important to not take any shortcuts and rehab these conditions properly because they can get worse and symptoms can persist for months so managing it early and appropriately is the key with a loading program that will progress gradually and get the person to the required capacity. In the words of CT Fletcher (you can check his videos on youtube) ‘It is still your set’.
References:
Cook JL, Docking SI. “Rehabilitation will increase the ‘capacity’ of your . . . insert musculoskeletal tissue here. . . .” Defining
‘tissue capacity’: a core concept for clinicians. Br J Sports Med 2015;49(23):1484–5.
Rio E, Kidgell D, Moseley GL et al. Tendon neuroplastic training: changing the way we think about tendon rehabilitation: a narrative review. Br J Sports Med.2016;50(4):209–15.


